Friday, March 15, 2013

Homemade deoderant!  Say what?! Give it a try!
baking soda photo: baking soda bakingsoda.jpg


Corn_starch : Corn flour

 
 This is not a subject I would generally dive into. However, I really feel like I must. For most people, I would assume , applying deoderant is a daily function , just like showering, brushing your teeth, doing your makeup, etc... You don't really think about it , you just do it, its part of your daily routine. Well for me, and I don't think I am alone, deoderant is somewhat of a preoccupation. Face it, no one wants to stink, and well, some of us may feel we smell more than others.

 I,  for one, think I am one of those "smelly"  people, weather it is  actually true, or just a perception of mine, it bothers me. I, in the past 30 years,  have tried every deoderant on the grocery store shelves at one time or another and still am not happy. ( The exception is Certian Dry. It works, but its it's expensive and gives me a rash). I have resigned myself to using Suave. Now, there is nothing wrong with Suave, with coupons I get it for like 40 cents. You can't beat that. It works as good as the rest. However, I still have to apply it twice a day not to be stinky,  ( even more in the hot summer ) , and deal with the heavy scent (though Suave's scents are nice) . It's frustrating and sort of gives me a complex.


 After reading hundreds of posts and articles I have come to realize that baking soda and cornstarch deoderant has a huge following. It has almost a 100% satisfaction rate. Honestly,  I thought it was unbelievable and just  for those "crazy green, modern day hippies", until I tried it myself.


 I mixed 1 teaspoon of baking soda to 2 teaspoons of cornstarch. This should last me least a week ( I am way-y-y heavy handed), and I did it at such a small amount as a trial basis because I honestly didn't think it would work.


 I mixed it well and put in in a ornate antique ceramic makeup jar  that was my grandmothers because, A. I wanted to disguise it and, B. It looked pretty on my vanity. You can put it in anything you want , a jar, a tupperware container, as long as its sealed.

 After showering and while I was in my towel and my armpits were damp, but not soaking wet, I dusted quite a large amount on using an old fluffy makeup brush.  I applied it just like I was powdering my face. You could use your fingers to apply if you don't have a brush, I just thought the brush was quicker, more sanitary, and more uniform in application.

 Now, this IS messy. Its like any other powder, it kind of goes everywhere if your not slow and presise in application (which I am not).  Being skeptical I put a ton on and had   quite a bit of transfer on my shirt when I got dressed. (Again, apply it directly after showering, before you get dressed).
  I was shocked that I could remove the residue  on my shirt with a damp cloth. Normally, if I would have gotten regular deoderant stains on my clothes I would have had to change.

 I AM AMAZED.  Its 10+ hours and I have zero sweat and ZERO odor. I am 100% "stink" free. I smell NOTHING.  And I mean 100% NOTHING. When I use traditional deoderant I smell something at at least hour 4 (if I am lucky- most of the time its hour 2). Usually its a combination of the deoderant and "stink".  Never, ever, ever have I been able to go this long an smell nothing. Truly, my mind is blown, and that is the only reason I am doing this post.


 I have found most comercial deoderants are heavily scented to mask the "stink" smell. The unscented versions, even those for men, simply don't mask  b.o. . I don't want to smell -period and I really don't want to smell my deodrant. If I  want to smell I use my perfume, (thats why I have perfume ) not  my deoderant.


The only draw back to this deoderant recipe  is that the baking soda may cause a rash on some people. That is why I made such a small batch. Most posts I have read that complain of a rash is after a week or so. If you try this and experience any rash, itchyness or discomfort, up the cornstarch by one, whatever- your- equal -measurement, is to the baking soda,  until you find the perfect recipe for you.


I personally do not see myself going back to commercial deoderant - ever, and this is only after one day.  Trust me I am such a skeptic! This cost me pennies, does not stain my clothes, leaves me 100% dry, and is truly unscented. What is not to like ? If you don't like it no harm, no foul - go to the store and buy a stick of Secret or Suave or Dove or whatever.


Sunday, March 10, 2013

            HOMEMADE  RED LIP  TINT

Kool Aid photo: kool aid kool-aid.jpg

prgrsvimghttp://ts1.mm.bing.net/th?id=H.4538102052422020&w=98&h=108&c=8&pid=3.1&qlt=90

  I happen to love red lips, however, red lipstick can be high maintenance and look, well, high maintenance and made up . I have been on a homemade kick lately. With that said, I have been researching online for homemade makeup alternatives and have seen plenty of posts about using kool-aid as a lip stain.  Honestly, I was like "What, no way! A perfect red lip for less than 25 cents that lasts all day!  Your crazy!"  It's to good to be true. Well, sort of . Let me explain.

 Most posts call for you to simply open a pack of red kool-aid (I use the Tropical Punch flavor as it gives me the best red color), wet a q-tip or your finger (beware it will stain your finger if you do this) and rub  it on your lips, let dry, dust off leftover crystals and go. Simple, right.  Well,  yes, but there is a terrible downside.

First, unsweetened kool-aid in the little packs taste not so good, its bitter, and it BURNS, yes, it burns your lips.  Well, at least it burns mine, and it burns something awful. Sorry, I don't like burning lips. On top of that, its so messy.

So being as stubborn as I am, I was determined to make this work, and save me a small fortune in red lipstick (although I do love my red lipstick and have no problem spending a few dollars on it).

There are plenty other posts online about making a  kool-aid lip balm by using a pack of kool-aid added to a tub of  melted vaseline and viola!  Lip balm. Hmmmm, I'm thinking about combining this idea, Ohhhh yeah, this may  just work.


Here we go,

1  tablespoon of vaseline  (petroleum jelly)

I get the generic at the dollar store for a dollar, its all the same for this.


1 full  packet of tropical punch kool-aid

 ( I use tropical punch because it gives me the best true red, you can try whatever you like. Mind you, the finished product is not the same shade as what it turns out as on your lips. To know the true color of the kool-aid "lipstick" , add a drop of water to a bit of the plain kool-aid. When the kool-aid meshes with the water, that gives you the true shade.)


 ( 1 packet of unsweetened kool-aid equals 1 1/4 teaspoons just in case you were wondering. Yes, I  actually measured. Sorry , I am kind of  O.C.D.)

1/2 teaspoon of sugar (this is optional but trust me, kool-aid unsweetened tastes awful and again, it BURNS! The bit of sugar is more than worth it)

tooth picks

small glass bowl

little container for finished tint-

 I used old Smiths Rosebud Salve tin I had saved because I liked the tin, but any old lipgloss pot, lipstick tube, chapstick tube, or old eye cream pot would work. If you don't have one of these go to the dollar store, any tiny container would work. Fact is, I may make lip balm for my nieces next Christmas and the dollar store has a 10 pack of small "tupperware" containers for a dollar. They have both round and square.  They are slightly bigger than a standard lipgloss pot but for the price I don't care.
 
Lets get to it!


Melt vaseline in a glass container, in the microwave, for 2 minutes. It will not look melted. Stir with a toothpick (trust me, tooth picks make much eaiser clean up because you just throw the tooth pick away) the vaseline will melt when stirred.


Next, add the sugar  slowly and stir, stir, stir. Again, optional, but I won't make it without it.


Then, VERY SLOWY add the kool-aid and stir, stir, stir. If you add the kool-aid too quickly you will get "clumps" that WILL NOT MELT  and you have to throw it all away. Slow is the key.

If the vaseline starts to set back up, put back in microwave for 20 seconds. Pull out and stir, stir, stir. Put back in for another 20 seconds if needed and-----

Stir, stir, stir. Then stir some more and more and more.

Pour into your container of choice and put in fridge  for about an hour or let set up at room temp. over night.


To use- apply to DAMP lips with a BRUSH.  If your lips are bone dry you won't get any color (the kool-aid needs "water" to form color) and if you use your fingers it will stain- badly, again, this is a stain.

I actually use a $1 E.L.F. essentials concealer brush, that I got at Kmart as my lipbrush.
 

 I was shocked by the color I got. It was a bright, yet natural red, but still red, realy red shade that actually looked as good as my red lipstick,  just more "real".


I am trying to perfect this recipe because it came out  very, very  gritty. (that is why I am enforcing the whole stir, stir, stir thing.)  I have to  lick and rub my lips together to melt the grit and give it full color.   However, it is much, much more gentle and user friendly than using straight kool-aid as a stain. I don't think I stirred enough during my " I-got-it- almost-right" batch because I got impatient. I wasted 7 packs of kool-aid and a half a tub of vaseline trying to get this recipe down. Its still not perfect but if you want a cheap,  yet, better alternative to the plain kool-aid lip tint seen on Pinterest or other posts try this.

I will  use this daily all summer long. ( I wear red lipstick every single day) Its great for my less formal functions , like B-B-Q's, boating or motorcyle rides, when my full on red lipstick looks a little out of place.

To be honest, I don't know yet if this is going to be  a permanent  replacement for my regular red lipstick and some of you may say "Oh girl, your nuts!!  I'm just gonna spend the $ for my lipstick  cuz' this ain't worth the trouble". But, if you want something long lasting,  a bit more natural, and dirt cheap (com'on its pennies compared to at least $2.00- $5.00 for a decent cheap drugstore red lipstick), it may be worth the try. It can be a bit messy and the kool aid can stain everything. I recomend putting newspaper or a plastic bag down on your work area. Plus to wash the vaseline out of your glass container is  a greasy mess. Nevertheless,  I am very pleased with the finished product when it 's  all said and done.

Sunday, February 24, 2013

Finding the perfect red lipstick- part two


Well, since I can't find a .99 cent lipstick to suit my needs (damn) I am moving on to a slightly more expensive , yet still dirt cheap drugstore brand.


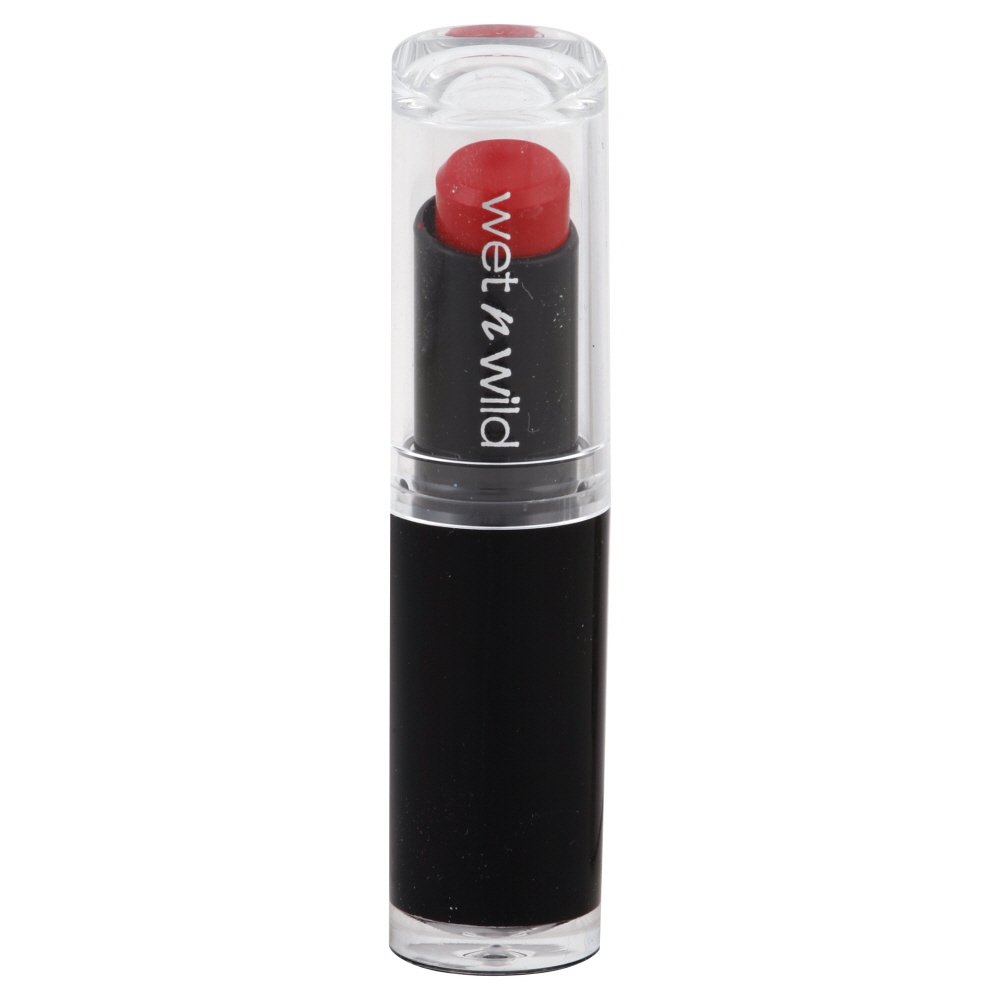
Today we are looking at Wet - n- wild matte lipsticks. A mere $1.99 at most Rite aids, Giant grocery stores, Walgreens and some Cvs's and Walmarts. ( I live in southeastern Pennsylvania so I am basing this on my availibility, I apologize if these brands aren't in your local area)

The two true reds in this line, that I have found so far, are Stoplight red and Red Velvet

Both are matte, yet non-drying and fairly longwearing. You can apply, blot, apply,  fix with a lip brush, and are good to go. However, if you eat something greasy (ie. pizza or in my case I love pasta with an olive oil/ garlic based sauce) they will smear- badly.  If you do not mind touching up occasionally these may be perfect for you.

Stoplight Red- Ahh, my favorite- A true, slightly blue-based, bright red. This is bright ( but not too in your face so) and red. I mean RED, No pink or orange just plain red. I have even read this is a dupe for the famous MAC Ruby Woo, which is 14 bucks or so. This is really a must try if you want a true red without breaking the bank.

Red Velvet- Its red, and bright, but this one has a certain warmth to it that is hard to describe. I almost want to say it pulls orangey, although it doesn't have any orange undertones. In the tube, compared to Stoplight Red, it looks more pink, and bright but shows up warm. Odd, yes. Still very pretty but not a true, true red.

The winner of these is Stoplight Red, however, since I am so "fix it and forget it" with makeup these still are not perfect for me. So, next time its onto a higher price range (still drug store range) but more expensive.
 

Still. don't overlook these little $2.00 lipstick gems. Again one of these may be perfect for you and if not, like me, your quest continues.


Thursday, February 14, 2013

Finding the perfect red lipstick - part one


red lipstick photo redlipstick.jpg
I happen to love red lipstick. I wear it every day weather I am wearing jeans and a t-shirt or a fancy going out dress. I know there seems to be some kind of "fear" of red lipstick, with the majority of  women  and girls (in my humble opinion, and at least in my area) tending to lean torward nude lips and more smokey eyes, if they even wear makeup at all.

They say there is a red lipstick for everyone, that is true, however I think it is really hard to the perfect red (oh, I have bought quite a few) so here I am documenting the ones I have tried in an effort to help to make it easier.  Ladies, the perfect red will make you look fresh and alive even if you don't have a stitch of makeup on! Trust me, once you go red nude makes you look dead!!!


 First off let me start with the cheapest of all cheap reds, which, honestly is where you should start to if you are experimenting with red. Why waste money.

( For reference- I know everyones coloring is different therefore what looks good on me may look awful on you. I think I am very hard to match. I have black hair but very, very warm brown eyes and my skin has neutral undertones but rosy blotches - I do tend to lean torward warm, ie yellow based foundations and cooler or neutral make up shades but can pull of some warmer tones. I just give my honest opinion of what the colors look like to me.)

  Onto the  reds--

 N.Y.C.   (New York Color) .99 cents at Rite aid, Target, and some CVS's and Walmarts 
NYC NEW YORK COLOR ULTRA MOIST LIPWEAR

Plus if you buy any of these at the major drugstores they have a money back guarantee policy so if it doesn't look good, take it back. Rite aid is really good with this.

Sheer Red-  This is a very "safe"  or starter red, its not a bright red at all its more of a deep berryish/brown red, fairly neutral. Very creamy and sheer. Takes multiple applications and blotting to get it built up to any depth. One coat is more like a heavily tinted balm.  Pretty color though and goes with everything.


Retro Red-  Perfect name.  Very 40's kind of red. Creamy but much "heavier" than sheer red. ( apply, blot, apply and your done ) Very pretty bright red, however, leans torward the corally/orange spectrum. I want this one to work on me and while I can pull it off its not perfect.


Ruby- This is a very unique red in my opinion. It has a beautiful gold shimmer in a pink/cherry-ish lipstick. Fairly neutral (due to the gold shimmer ) leaning torward cool since the actual color is pinky red. I feel this is better for a party or special occasion red. I would like to but really can't use this as an every day red.

NYC lasting finish lipstick $1.99

Red Flame- Pretty much identical to Ruby yet slightly more neutral  and wearable longer lasting

Wet - n - Wild   the Silk Finish  .99 cent line at Walgreens, some CVS, Giant grocery store, Rite Aid
Wet n Wild Silk Finish Lipstick Cherry Frost 514A .13 oz

The only real red line is this is Cherry Frost (which also has a number code 514A on the bottom but the name is printed on the plastic covering on the side)

 This is  exactly as its named, a very cool, deep, yet bright cherry red with a lot of shimmer. Again I love this color but its not an everyday red. The finish and wear is nice, apply blot apply and go. Full coverage.


 If one of these can work for you fantastic! You can get yourself a fabulous red lip color for virtually no money. For me we need to spend a bit more in the search for the perfect red. That will be "Finding the Perfect red  part 2"

Tuesday, October 30, 2012

Best conditioners for co-washing


I have posted before about co-washing, and have debated whether it really worked for me.

 After two years of off and on and several months of  serious trial I believe co washing is the way to go. Fact is I have been co-washing faithfully for 4 months now (with an occasional shampoo to clarify) and when I recently tried to go back to a traditional shampoo and then condition my hair was awful.

There any many, many post on co-washing on "curly- girl" and ethnic hair care sites but I have found that many  of those recommended conditioners do not work well for straighter, less dry hair and scalp types.

 I have found the key to a good cowash conditioner is one that has little to no silicones or heavy conditioning agents. Avoid ones with any silicones high on the ingredient list and avoid dimethicone completely, as it tends to the the "strongest" silicone and can cause buildup quicker, requiring some form of surfactant to remove.  Silicones aren't bad but if you want to co -wash a conditioner with alot of silicones will not leave your hair feeling clean. It will be greasy and heavy feeling.


Look for conditoners that contain one or more the following :

    cetrimonium chloride
    stearyalkonium chloride
    stearamidopropyl dimethylamine
    dicetyldimonium chloride
    behentrimonium methosulfate

These are what cleanses your hair .

 Go cheap!! Really, hit the dollar store. Some of the no name $1.00 conditioners are great options for co -washing.

If you want a bit more moisture in your cleansing conditioner look for ones that have glycerin or even oils lower on the ingredient list. Oils are what I consider a natural alternative to silicones.


 After testing lots of conditoners (All the vo5's, White Rain and Suave Naturals plus a handful of no name brands) here is what I have found from my experience.

 The best conditioners for co- washing are-

Suave Daily Clarifying conditioner- best overall performance period.

Suave Everlasting Sunshine conditioner - best scent.  Most of the Suave naturals have almost identical  ingredients just different scents so if you prefer a different scent go for it. However, I say avoid the insanely popular Suave Coconut it contains ammonium xylenesulfonate which can dry out hair.


Silkience spa haus salon conditoner- only sold at Dollar Tree- best for moisturizing without being heavy


  Vo5 and White rain are also really popular,  but didn't make my best of list simply because I really think these others out perform them. I did review Vo5 conditioners in the past but again I feel the ones listed above are better. However, I will give Vo5 Chamomile Tea Therapy honorable mention.  White Rain is good, its just getting harder to find.

  I tend to alternate my conditioners, mostly out of bordom and the fact that I am a product junkie and like to try new things. Then once every two weeks or so I shampoo with a non conditioning shampoo- such as Suave Daily Clarifying or even a cheap generic baby shampoo. ( I prefer shampoos that only contain sodium laureth sulfate- not LAURYL its to strong) My hair has never felt softer or been more manageable. Now if it would just grow super long, but thats another story.

Friday, July 13, 2012

                 Baby Powder as Face powder


 Yes, baby powder is a fantastic, dirt cheap setting powder for your foundation, especially if you have oily skin.

Think about it, one of the major ingredients in many loose and pressed powders is talc. What is baby powder? - talc. Unless of course you get the cornstatch version (which is NOT recommended for oily skin as cornstarch can lead to breakouts when it mixes with the oil on skin.)

  When I used to purchase pressed or loose powders I always look for the main ingredient to be talc as I know it holds up best on my uber oily skin. Covergirl, Maybelline, N.Y.C., Coty Airspun and many others all use talc in their powder formulations.

 I know there is alot of hype out ther about talc being bad and being linked to cancer, however, that has been debunked (for more info. on that go to cosmeticcop.com and start your own research there)  Still there is alot of misinformation running around out there making talc "evil" as well as many other well know, widely used ingredients, such as silicone, mineral oil and petroleum jelly. Obviously if you have a talc allery, avoid it, but other than that I cannot see the harm in using it.

  When using baby power for your setting powder it is a bit different than traditional  powders. First off baby powder is much, much more finely milled than any other powder I have ever used. Second, a little goes a long, long way.

Baby powder can make a huge mess. I have an old loose powder container with a sifter lid that I transfer mine into so I can shake some into the lid. If you don't have that you can always sprinkle some baby powder into a small dish, or a plastic lid off of most any jar and go from there.


 Baby powder is best applied with a fluffy brush, so you can lightly dust your face. Going to heavy will, without a doubt, leave you WHITE. Now if thats the look you need or want, go for it.  However, since most people want to look natural, go light and add more if need be until you reach your desired look.

Baby powder does not really give added coverage like some traditional makeup powders do. So make sure your foundation gives the coverage you need. Baby powder is strictly for setting and oil absorbtion. Also, make sure your foundation is the right shade for you. If its to light the baby powder will make you look to pale. However, if your foundation is to dark, a healthy layer of baby powder can help lighten it up.

 If you think baby powder is way to light for you anyway you can always cut it with your favorite loose powder to bump up its oil absorbing properties, or you can give yourself a super light dusting over top your already powdered face.

 My favorite way to use baby powder is to use up all the old loose powders I have around ) I am a product junkie

I used to  mainly use Coty Airspun loose powder or N.Y.C (which are both owned by Coty), however I wanted a truly untinted face powder so I mixed baby powder with my Coty since I hate to waste product. I mix it 3/4 baby powder to 1/4 Airspun. Its probably going to take me a year to use it all but thats okay.  I also perfer a matte face so I pat on the baby powder mix with a fluffy puff then I buff it with a small kabuki brush.  I am light and this can leave me a bit pale, but not ghostly, and I fix that with bronzer and a nice pop of peachy blush. 

 I donot think I will ever go back to traditional powders, as baby powder works so well for me. I use it over Revlon Colorstay and I may touch up my face once or twice a day, even in 100 degree weather. Thats huge for me. Also it never cakes or looks heavy.

 Give it a try, I get mine at the dollar store for yes, a dollar. I only buy the ones that contain talc and fragrance- no other ingredients. As for the baby powder scent, it does dissapate and you do get used to it after a while.

Sunday, June 17, 2012

  Pantene - the myth, the lies, and the truth


Pantene (Brand)
 Now, for years and years I have heard all the glamour and horror stories about Pantene and I personally have used Pantene off and on for years and years and I am willing to say
that I never had any issues. However, I am a product junkie and can never seem to commmit to one product for more than a few months (Oh hell, who am I kidding, weeks). Pantene is the only shampoo and conditioner that my husband and daughter will use.  I have done alot of researchin the past 10 years and read countless reviews. It seems people either love or hate Pantene and even have some pretty strange beliefs about the product.


Some of the things I have read are "Pantene is the devil"- whatever, "Pantene kills your hair"- hair is dead anyway nothing can "kill" it, "Never use Pantene, it is so bad for your hair"- myth, "Pantene makes your hair fall out"- myth- although alot of people take this as fact, "Pantene contains bad chemicles"-myth, "Pantene contains wax"-lie, better yet "floor wax- lie" "Pantene worked great at first then stopped working and dried my hair out"-  myth- it doesn't stop working, however, there is some truth to this- explained later. I have even read the most outrageous lie that "Pantene contains animal urine" this one supposedly came from a hairdresser.

  On the other hand I have also read claims that "Pantene saved my hair", "Nothing makes my hair prettier than Pantene.," "Pantene is the best ever". "I have used Pantene for 20 plus years and will never use anything else". "I only get compliments on my hair when I use Pantene."

 Now, how can one product have such rave reviews and horrible stories about it at the same time. Lets break it down.


 First off Pantene is not a magical potion. It contains ingredients found in virtually every other shampoo and conditioner on the market today. Yes, even some "all natural" and sulfate free shampoos contain ingredients found in Pantene. I mean, really, there are only so many ingredients out there that can clean or condition hair.


What Pantene does contain in both its shampoos and conditioners are silicones. Now, silicones have thier own set of myths and lies regarding them but what it boils down to is this. Silicones are great hair conditioners-fact. However, silicones can cause buildup-fact. Pantene is not the only shampoo/conditioner system to use silicones-fact. Most shampoos (especially conditioning shampoos) and conditioners on the market use silicones-fact. Pantene does however, use alot of silicones in its products.

  Silicones are responsible for making hair smooth, soft and shiny but when they build up hair will look dry, dull, feel almost like straw and can possibly cause eventual breakage. Those with thinner, healthier hair will notice build up quicker than those with very dry, damaged ,overprocessed and coarse hair. Dry/damaged/coarse hair needs more conditioning which is why it takes longer for buildup to be noticed.  Silicones are not the only conditioning product to cause build up.  ALMOST EVERY CONDITIONING PRODUCT WILL CAUSE BUILDUP EVENTUALLY, including oils, which are a big  natural conditioning agent. Therefore, a weekly or bi-weekly "deep cleaning" using a "clarifying" or silicone free shampoo will remove this build up. I think a weekly deep clean is needed no matter what shampoo/conditioner you use, unless it is truly silicone/oil free. Or, you can just simply "rotate" different shampoos and conditioners, as the different formulations can assist in removing  old build-up but then the cycle starts again. Build up is why many people claim thier shampoo and conditioner "stops working".

Pantene shampoos (the most current formulation as of early 2012) use sodium lauryl sulfate as their main cleansing agent. Again, much like silicone, sulfates have their own myths and lies surrounding them. We could go on all day about sulfates but here is the bottom line.

  Sodium Lauryl sulfate is a strong detergent cleanser. IT IS NOT HARMFUL.IT DOES NOT CAUSE CANCER OR ANYTHING ELSE!!!! However, it can cause scalp and hair dryness in SOME people. One way to tell if you are sensitive to sodium lauryl sulfate is if your head starts to itch a few day after continued use. I have this issue so I have learned to avoid ALL shampoos that contain sodium lauryl sulfate as it is NOT only used in Pantene. I only use shampoos that contain sodium laureth sulfate and few to no conditioning agents in conjunction with co-washing (another post). Pantene does try to buffer the effects of sodium lauryl sulfate with alot of conditioning agents in many of its it shampoos, so the shampoos themselves also can cause eventual build-up.

 Here's the lowdown. If you want to give Pantene a try go for it. They are, after all, the biggest name in hair care. Pantene conditoners are some of the best on the grocery store shelves for giving you shiny, silky hair. If you really liked Pantene but changed brands because you think it "stopped working" go ahead and use it just use a non-conditoning shampoo once a week or so ( Suave naturals are great for this)  to remove build up. If you are sensitive to strong cleansers don't use Pantene shampoo, (or any other shampoo using sodium lauryl sulfate and even TEA-lauryl sulfate, ammonium lauryl sulfate and ammonium xylenesulfonate for that matter). 

 The best advice I can say it do some research on shampoo/conditioner ingredients, and read the back of the shampoo/conditioner bottle.

  For more in depth information on sulfates and silicones visit the beautybrains.com or cosmeticcop.com ingredient list. They are very helpful websites based on science and not myths or personal beliefs about ingredients or scaremongering like some "all natural" websites promote.